Tutorial images
I have provided 2 version of a shot taken especially for experimenting with this process, the first is the original scan from transparency, the second is a monochrome version of the colour image, which has had some basic adjustments made to simplify the initial stages Although there are many things that are sub-optimal in the image, it is a good example to work with throughout this tutorial. Just in case you are wondering, there is a daisy in the foreground, not rubbish, although on the low resolution versions of the shot here it does look like waste paper.
Colour space for the image is sRGB. If you convert to a different colour space when you load it, you’ll get slightly different effects when you apply the colour transforms.
The shot was exposed to avoid blowing highlights on a high contrast slide film (Velvia 100) using a small aperture (f22) to give a starburst effect around the highlights. The small aperture has given the shot an overall slightly hazy effect due to diffraction. The overall exposure settings have given an interesting histogram, almost a double area histogram. Most of the highlights (chrome and other metal parts of the bike) won’t show on a standard PWP histogram (default expansion) and would most likely be clipped by users to max brightness to improve contrast – losing a lot of detail, whilst boosting contrast – something we already have a little too much of.
There is little shadow detail in either version due to the high contrast slide film, the scanner resolves it as noisy black, no further detail is recoverable. That tonal range remains dark and no effort has been made to expand or recover it because of its make up.
These images are provided for you to experiment with, but commercial reproduction is not allowed – the images are subject to copyright with all rights reserved, so contact me kevinelliott@hotmail.com for further permissions/licensing.
For those that are interested, the image was made on Fuji Velvia 100, using a Bronica S2, 6x6cm with a Nikkor 40mm f4 lens, roughly equivalent to a 24-28mm lens on 35mm (about as wide as it gets in 6x6). The camera was hand held at ground level. Exposure was about 1/125sec @f22. Scanning was carried out on a Microtek 120tf with Silverfast ai. The sun was low in the sky behind me, at about 5pm. Season was early spring, with no leaves on many of the trees, following a long, hard winter.
Monochrome Image
This image was created from the original colour scan, converted to mono by using the convert transformation in PWP.
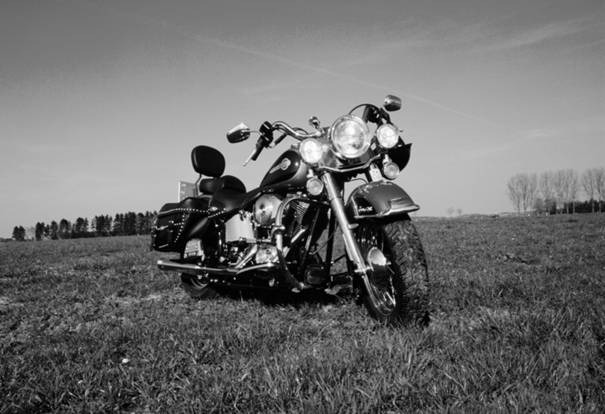
The monochrome image has had its tonal range adjusted to ease the initial experiments. The highlights have been compressed and the mid-tones stretched. These adjustments could have been applied as part of the Sabattier Effect changes, but I thought it would be easier to start with a reasonably well adjusted image, .even if it is still rather dark in places..
Colour Image
This image is the original uncorrected scan, merely downsized. I usually work with uncorrected scans as most of the adjustments needed to correct a scan can be combined in the application of the Sabattier effect to the image.
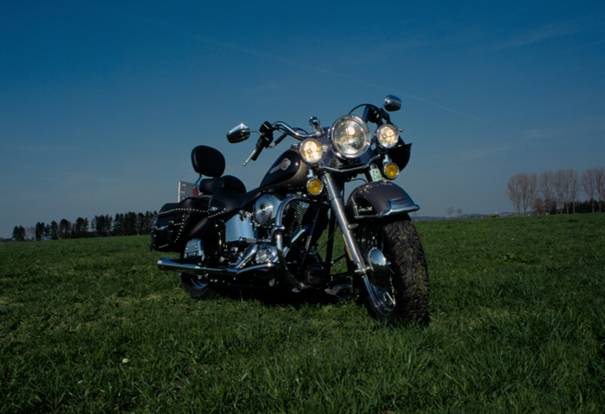
When you study this image, you will see that most of the chrome has the same colour as the sky, due to reflection. Your initial subjective reaction will be to see this as chrome – not as a surface that is coloured. We need to learn to see reflections as they really are. Coloured reflections can be a blessing or a hindrance, but it does mean that colour based separations (such as masks) can be a problem. However colour shifts can be used to move the reflections and sky together. That is a daisy in the foreground, not litter.
Overall the scan is too dark, with the shadows, grass and darker areas of the bike lacking brightness and detail. Highlights such as the bright spots on the chrome, lights and fork legs are well detailed and not blown out. Some starburst effect is visible around highlights in the original image. This has mostly been lost in downsizing.
For the last batch of examples, using the RGB curves the above image is unsuitable. I have thus also included a bright version of the image.