Effects of the control arrows
The effects of the control arrows are interlinked. Adjustments are a balance (and often trade off) of the effects of all the individual changes that you make.
The left-most control arrow (1) controls the shadow brightness. Moving the top of the control arrow to the right will force all the points below (to the left of) it to black. Move the bottom of this control arrow to the right and it forces all the darker points of the image to a new lighter shade. Excessive use of this will emphasise noise in the shadows and sometimes show up posterisation in the shadows that would otherwise be unnoticeable.
The rightmost control arrow (2) controls highlights in the image. Move the top of this to the left and all image tones brighter than this are mapped to white. Move the lower head to the left and the overall image brightness is reduced.
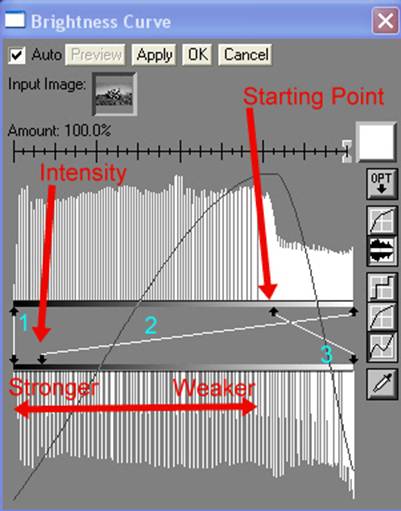
The new control arrow (3) creates and partly controls the effect. The top arrow head controls the starting point, mapping the starting brightness setting to white or 100%. The lower arrow head is used to expand the tonal range of the darker areas of the image so that we achieve a full brightness range in the output. Note that this is, to some effect, increasing posterisation.
To invert the highlights, and create the effect we move the bottom of the right control arrow (2) to the left (darker). By moving the lower point further leftwards we intensify the effect. Watch how the lower histogram changes as you move to the left. Posterisation sets in in the inverted portion of the image (the gaps between the lines) as the brightest parts of the image are mapped to darker and darker areas. As the range stretches, so the number of pixels at each brightness level reduces, this allows us to see the inverted tones in the histogram.
Now experiment with the top position of the new control arrow (3) that you added. Note that small changes produce big effects as the pointer moves through the tonal ranges in an object. This is really visible in the oil tank as the pointer moves around the 60-70 region. Note also the effects on the other parts of the bike, sky and grass as you move the pointer around.
Experiment with the lower point of the rightmost control arrow (2), in this image it’s possible to get the highlights in the headlamps to move from bright to black, each position creating a slightly different effect. Generally the stronger the effect the more impressive the image is.
Different images require different treatment, and different artists will want to achieve different effects. There is no right and no wrong here, just a matter of achieving what you want.