Double Inversions
With PWP there is no practical restriction on the number of inversions that can be applied to an image in one operation.
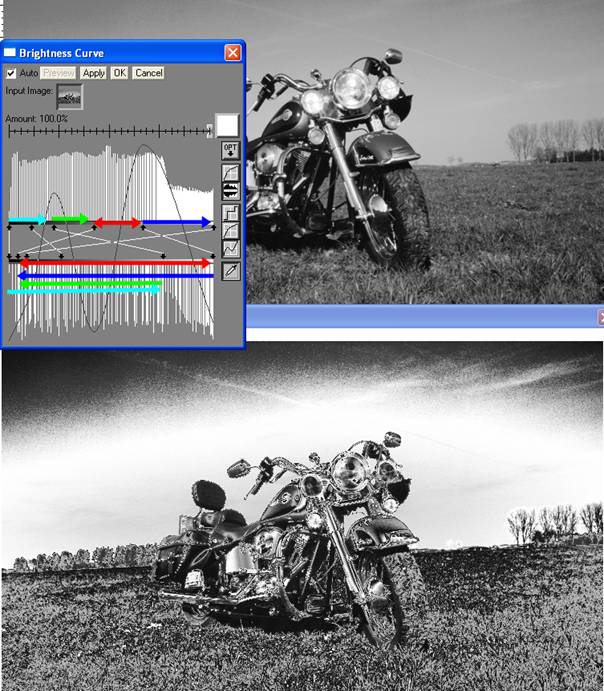
Despite the apparent complexity of the histogram, it is only 2 more control arrows added than in the earlier example of single inversion with anchor. These extra control arrows have broken the image into 4 tonal ranges, each of which has a different treatment.
As before the top line of coloured arrows represents the tonal regions in the original image, the lower line the tonal ranges in the result. Arrowheads indicate how that range within the image has changed (inverted or stretched).
First the blue arrow – this is similar to previous examples - the transition point is in the oil tank’s tonal range, in this case about 70 or so. This tone range is inverted and the tonal range stretched.
The new second inversion is shown by the green arrow. Here I have inverted a tonal range which roughly corresponds to the grass, although some parts of the bike and trees are also affected. The tonal range is stretched considerably. Although the grass looks a little strange in this example, what I want to concentrate on is the effect on the other areas, especially the area covered by the red arrow.
The red arrow area corresponds to some, but not all of the sky. By stretching it like this, the darker areas are close to black, while the lighter areas are even lighter. This has emphasised the tonal gradient in the sky, almost creating a halo around the bike. It’s also increased the visibility of the clouds and vapour trail, almost creating a cross above the bike where the vapour trail and clouds intersect. The wide angle lens has accentuated this.
The control arrow in the cyan area is no more than an anchor to control the shadows.
So the addition of two extra control arrows has resulted in two distinct extra tonal areas, with a strong positive knock on in an area that was not inverted. Often multiple inversions require the upper transition point of each inversion to map close to black in the output image. This is the case in this example, The upper tonal range of the grass is inverted close to balck, and the upper tonal range of the highlights is mapped close to black as well.
I suggest you experiment with fine adjustments to the transition points at either end of the upper red arrow. It allows you to control the size of the halo around the bike as well as the darkness of the sky.
Remember to expand the transform window for better control:
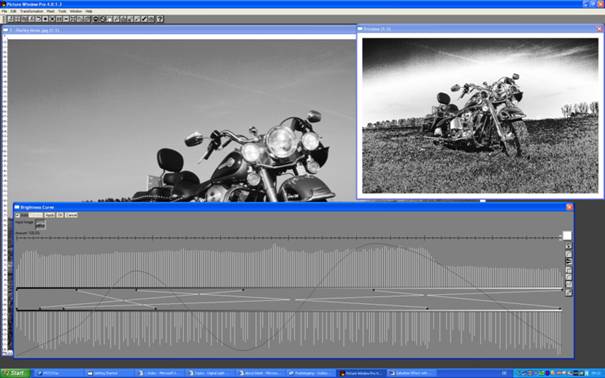
There are some lovely effects with the image as it stands.
- The front mudguard/fender has turned into a lovely liquid creation
- The trees on the left look as if they have been painted in
- The gradations in the sky create a frame for the bike
- The posterisation of the sky adds to the effect
- Much of the bike is outlined – almost like a pen and ink drawing
- The chrome rivets in the leather saddle bags look as if they’re part of a pen and ink drawing
However it is not perfect
- It needs more contrast to add impact
- The front tyre fades into the grass (correct by fine tuning the transition points)
- The trees in the background need cleaning out around the back of the bike and under the front mudguard/fender